Tuesday, December 14, 2010

Merry Christmas

Hi everyone,

Just a quick post to wish you all the best for the festive season. Hope Santa brings lots of Model Railroad goodies!!!


Be safe and hope to see you all in 2011.

Merry Christmas
  
From the Bowen Creek Family 


Thursday, December 2, 2010

Decoder Programmer

See I told you other projects would pop up. Ian and I purchased a Sprog II each from the UK and it arrived earlier this week. We saw these at the New England convention with Gerry Hopkins and this will allow me to use Decoder Pro in my study without having to set up Bowen Creek. I am still learning Decoder Pro but why would you program your decoders without it, it just makes it so easy.

  
Decoder Pro is a FREE download and a must for all Decoder programming. Check it HERE. The other thing you will need is a power supply, I picked up one from Jaycar, part no. MP-3011 for $19.95. You just cut the plug off and place the wire with the white stripe to the +V and the wire with the writing to the 0V on the sprogII. The rest is straight forward.


Now just to clarify, you can use decoder pro linked from your computer to your command station but the SprogII just allows you to do it without it. You don't need the sprog unless you want to program decoders away from the layout.

Happy Modelling

Andrew

Friday, November 26, 2010

NSWGR RU....

I have been waiting to start this project for some time now and I have delayed for a number of reasons, the biggest being having the patience to do 20 detailed wagons but  I have bitten the bullet and started. I expect this will take a long time as other projects will come and go, as well as my interest but I think if I post my efforts it may help to keep things moving.

A few things are required.
  1. Greg Edwards Data sheet.
  2. Detail photos, personal and from ARDP from Keiren Ryan models. 
  3. ILM detail kits (which, unfortunately are currently unavailable but I have them).
  4. Trainorama RTR RU's which are also currently unavailable but also, I have them.
  5. Sergent Couplers
  6. Keiran Ryan's Brake rigging etch part no. KRM HO 006.
  7. P87 36" axles 0.944" length from NWSL part no. 37668-1 
  8. Click HERE for prototype description. 
I guess points 3 and 4 make you realise to get things while they are available, I think we have all been burnt here before.
I may use the chain I am not sure

 15 of the kits have been washed and drilled and the W irons have been folded and soldered. I am still waiting the correct wheels to arrive. 

The W iron etches aren't perfect as there is a bit of filing and drilling to do to get them right, but this is outlined in the instructions. I have also cleaned off the undesirable bits from the Traino bodies as per the ILM instructions. I have a plan of attack in my head for this but will see how things pan out, things always change and mistakes are always made but hopefully good karma will prevail. 
I will keep things as up to date as I can, cya. 

Monday, November 22, 2010

Bogie updated....

Tom Rogers kindly pointed out a few missed details, might make him an editor I think! I failed to mention I was using 24.5 mm axle lengths. NWSL part no. 37668-4 for 36" wheels and part no. 37667-4 for 33" wheels. AR axles are 25 mm in length so you will have to close the gap by 0.5 mm and you will get this with the bearings. I can't remember the actual length of the other manufacturers axles as I have discarded them, stupidly. If anyone still has these axle lengths can you please let me know?
  I believe you need some sideways movement just not to much, and to accurately do this is almost impossible but the bearing tool does help as you can set the depth. Perhaps I should have recorded the depth data, I will endeavor to do this. I guess this means there will be another follow up to this but worth the effort I think.

Cheers

Thursday, November 18, 2010

Bogies.....

Hi Peoples,

I had been asked about fitting wheels into Trainorama, OTM and AR bogies. Well the fact was that these bogie's have been running pretty well with the patch job I did to have the ready for Epping 2009. Well they have survived quite a bit of running since then but I am now doing them properly and thought  I 7should post the method up before I forget.

 I have bought some bearings and bearing tool from AR kits which do the job just nicely.


 File the back of the bearing as there is a fine wire that protrudes and I find this to be unhelpful, 
so get ride of it. 

Use the Square cutting edge of the bearing tool and set it to cut slightly deeper then the bearing depth.

Fit the bearing and repeat in each axle box.

Check gauge 

Once you have installed the axle, use finger pressure and squeeze to set the bearings all the way home.  Once this is done the axles roll very nicely without excessive play side to side. 
  
Cheers

Saturday, November 13, 2010

Conventions and Exhibitions

Evening Followers,

After attending the New England Convention last week, my opinion of exhibitions has deteriorated. This to me was the pinnacle of  what I what from this hobby. Like minded people getting the chance to socialise and share ideas and techniques on modelling. If you missed it, get down and pray the next one isn't too far away.

Exhibitions are a rush, they're noisy and you really don't get the chance to sit down and mingle with fellow modellers. Some have dinners on the Saturday night but most are too buggered to really make a night of it and that's even if they attend. The New England club need to write a paper on how this was done so other clubs can learn from their achievement.

How great it was to catch up and meet fellow bloggers. If these guys had stopped to chat at an exhibition it would be hard to really have got to know them as you are usually too busy to really spend much time chatting. Bowen Creek stood still for most of the weekend and people still stood there enjoying the model without trains running. You don't get that at exhibitions much, generally the crowd moves on once the train has left the scene.

Some of the other bloggers have written about the weekend but I will add some pics of what caught my attention.

 I thought Dean Bradley's weathering work was exquisite. There is no doubt I will try to follow some of his techniques.

Ian Phemister's 1942 EZ kits looks just the part crossing the Timber Trestle apart from those OVER scaled wheels and couplers hey Ian. Loved the ride in the Mini Cooper S, "NOICE" .

Peter Street's Oil Depot. I never really considered one of these for the home layout, but after Peter's talk I think I will add one. He pointed out how this can add some operation to the layout with little space used, I never considered this, but he is right.

Exeter..self explanatory really

Thanks to everyone who attended, you guys really made the best Model Railway weekend and it's funny how the young fellows and the old buggers got along. Apparently, according to the forums, this doesn't happen. Maybe this says something about the forums. Some of the talks were done by older gents, I wouldn't have had such a good time without them.


CYA at the next one

Andrew

Friday, October 29, 2010

Decision made, I think....

Hi everyone,

As a follow up to the last post, let me inform you of some conclusions. Firstly thanks to those for their input, it is much appreciated.

I have decided to still do Merriwa, although renamed to Gundabri. George Hall was a town founder and lived on (or tenanted) what I think was a local  station called Gundabri, I believe near Gungal. Will have to research this more however this will do for now.

The advantage is I can now apply some modellers licence to the line and keep this yard reasonably as is. So, leaving Gundabri yard the line will turn right, instead of left, and meander up a gentle grade of open line for about 43 feet (13mtrs). We now enter Halls Creek (Sandy Hollow). This yard will be reworked and possibly look a bit like Canowindra, without the silo, but with the grain shed. Also added is the co-op siding and possibly a flour mill. Still a bit vague on this but you get the idea.

From Halls Creek we start on a long steep climb to the upper deck, we possibly could use bank engines here. Wow, bankers on a branch, well it will add interest. The grade is expected to be a 1:50 and another 45 foot run. This will be very slow, I really want to use the load function on the DCC here. This function allows you make your locos crawl at say 8 miles an hour but ramp up the sound to really let you know the engines are working hard.

The grade now eases and  we can see down over the valley from the upper plateau as we meander our way for a further 28 foot run and enter Wybong. This is  a passing loop and a signal box here, similar to Pangela. It will be fairly short in length as to make any long train passes interesting however most trains will be of the shorter version. Will also have water facilities for steam engines.

We are now left with a 69 foot run (21mtrs) to Muswellbrook which will be hidden staging. I plan too run more trains then the line ever would have seen in its usual form so this should make interesting operation nights with lots of movements. I do plan on having way-bill cards but timetables will be lax. Also all yards will be staffed with miniature staffs but more homework will need to be done on this. I also wanted the long runs to give the feel of distance between yards and have those nice bridges, cuttings, level crossings and all the things that you would expect to see on a NSWGR line.

I do have an option, Halls Creek could be built as a junction, which would see the line as more of a secondary line and Gundabri becomes a branch. This would see a second hidden staging yard but I am not so keen on this idea as it may be to crammed.  I will draw it up properly one day and post it but not soon.

Writing this out has gotten me fired up a bit so, I made a start on my RU project which I will share soon. One thing the last post did, was make me realise that I had lost my way a little and forgot that I really want to capture railway scenes and model that detail that sets some models apart.  So I will leave with a pic that Thumpa posted on railpage, it gives the feel of what I want out of modelling a NSW branchline. Thanks again.

Cheers 
Andrew 

Thursday, October 14, 2010

What to do now....

Well I know my posting has somewhat slowed in the past few months and there are other things on the layout that I would like to share. My attention really has been on future projects, namely my home layout.

I have built the layout shed and had it lined, so now I am trying to really work out what it is that I want in there. The layout room is basically 23 feet by 18 feet and it was always intended to build the Merriwa branch. My issue is although I really like Merriwa yard, the rest of the line I am not so sure about. There are some structures I want and they are not on the line. EG . I want the Half Howe Truss Bridge. How much modellers license can someone have before you loose the atmosphere of the line that you are modelling?

My latest thought is to build hidden staging and come into Merriwa, then build what I perceive to be the Merriwa Extension,  but does that change the way that Merriwa would be, most of the facilities would have been removed I would think and then it no longer could be considered Merriwa.

Does anyone have any opinion that would maybe get me out of this developing rut.

Andrew

Friday, October 1, 2010

Pretty in steam...

Light has not hit Bowen Creek since Newcastle and to be honest I am rather glad. Now that the warmer weather is here, the house and gardens have been getting a spruce up and besides I am lacking some motivation at the moment. The New England convention is only 5 or 6 weeks away and I am really looking forward to that. We had a few breakages in Newy but we have a days work set aside and all should be good.

In the mean time lets look at steam in P87. It is still a long way off but there are some motivated people tossing around ideas on how things can be done. Oscar Deluca turned up at Epping last year with his Brass 30T and it was the first time steam had been tested. Mike McCormac had turned the wheels as he did on his dogbox and the result was inspiring. Now these took Mike hours to do so I don't believe he will ever do these for anyone but himself ( which is fair enough) it proves the possibilities, which inspired Bowen Creek in the first place.

I nicked this off Railpage, Thanks to Craig Mackey

I need to do this for myself and a few others who want steam, it will happen just takes time. Meanwhile other things need to be done..such as that RU project. Anyway this was just a quick update so everyone knows I am still alive and we may see you in Armidale. Hooroo

Sunday, September 12, 2010

Newcastle Exhibition...

Well its' been a week since the Newcastle show and to be honest, I need a week to recuperate. We left Port Macquarie about 1300hrs on Friday and after a wet rainy trip, arrived at the race coarse about 1700hrs to find Tom Rogers waiting at the gate. Tom is a regular staff member at Bowen showings and is now a dedicated P87 modeller. Set up takes about an hour and after some line repairs and testing, we were ready for Saturday. So it was down with a bodgy dinner and check in the motel. A beer or two were downed at the RSL and giggle at the local teenagers in their wacko gear before calling it a night.

Saturday morning brought a traumatic start. The electronics went nuts, it wasn't until the boys on Mile638 came asking for help on their layout, that it twigged that the we were getting some electronic feedback from another stand. A new power supply was sought and Mile 638 and Bowen Creek both operated faultlessly for the rest of the weekend, PHEW!

Sunday (fathers day) brought the annual gift giving and for me this meant a Canon 500D DSLR, Yippee!!. So my eldest son Matthew, took it for the day and took some pics of the show. Don't quite know how that happened but what do you do....


A-Tractiv Effort 
A-Tractiv Effort 

 
Mile 638

Not a bad effort from the young bloke. Very enjoyable week end and look forward to the next one.

Andrew 


Wednesday, August 11, 2010

Backdrop...

Hi All,
Things have been progressing slowly towards the Newcastle show which has kept us busy. We are trialling the cobalt motors for the points and I must say with mixed results. They claim to be quieter than the tortoise, which they are, but some are still as noisy. One is a struggle to hear any sound at all while another is as noisy as anything else on the market. They are smaller which is welcomed.

Anyway, this is a little bit about the backdrop we installed which I think is unique to the exhibition circuit. I had this idea of a seamless backdrop, I hate obvious joins in layouts and it spoils the effect for me, as it really catches my eye. We had built the layout as a diorama style, so I didn't want to ruin the effect with big joins in the backdrop.
How do we achieve this? I had no idea so it was time to appoint someone. John Barrett was the man for the job.
JB is an exceptional modeler, his achievement in the hobby is renowned with his work on Beyond Bulliac. JB is a sign writer by trade and a pretty good one too. I took the idea to him and he thought it was a good one and so I left it with him. Two months later he had it, canvas! John had done some RTA banners for whatever reason, you know the ones you see on the highway roadside, I thought this would work. A small sample piece was tested using plastic paints so it could be rolled up without it cracking. Everything seamed in order so we went for it. JB had arranged for a local guy to cut the canvas and sew in a small 6mm rope along the top and bottom and two eyelets at each end which attach to pins either end. An aluminium u-tube is installed which the rope slides into to hold the sheet up.  Now I have no idea what all these things are called but once again a picture tells a thousand stories.

 
Above you can see JB happily painting away, if you look at the canvas you can see the eyelet, where the rope is stitched in and where the it slips into the aluminium bracket.

 Here is where the canvas attaches to the layout, this keeps it nice and taught along the length of the scene.
I am very pleased with the end result.


Cost wise it was a total cost of about $250, which I think is quite reasonable for a 6 meter long 500mm high piece. I think if we were to do it again I would look at having a scene printed on the canvas but I am still pleased with what we have. 
Cheers 

Saturday, July 10, 2010

Height....

This is a subject that is wide and varied. Bowen Creek is a tall layout, I am the first admit that, it stands at 1530mm from floor to track level. This was brought about because Ian and I are just over 6' tall and we want the track brought up to eye level. Now for some, this will be too high but it was done for us to test a theory for our home layouts, and I think that people at exhibitions may find it a different view point and think about the height of their own layouts. For too long, in my opinion, layouts have been built far too low. Why?
  1. Because that's the way it has always been done, perhaps.
  2. so the kids can see.
Point one may be the only reason because people have in their head that there is some unwritten rule that says, this is how you do it. Now at exhibition there will be those that whine that it is too high, but hopefully we can make them think outside the square. A lot of us, including manufacturers, are doing underfloor detail, but what's the point if the layout is 3 feet off the floor. Besides, we do it because you see that before you see a roof.

Here is another way to look at it, if I go to a railway yard and stand next to the rail, my eye level is six foot above the rail. Even an S truck is still taller then me. So with Bowens' rail height at 1530mm and my eye level at 1730mm, I am still 57 scale feet above the rail. Which means I can still clearly see across the roof of the goods shed.

As for the kids, I find the ones that are interested are only interested in the train. Their attention span isn't all that long and the detail in buildings and scenery aren't of much interest to them. Even my boys don't stay for more then a lap or two. I don't want to sound like I'm anti kid here, but honestly I find the first question that gets asked is "How fast does it go?" or "Can we crash em!". They will have much more fun on a U-Drive then spending time at Bowen Creek. We did have one little five year old at Epping 2009 that blew our socks off with his knowledge and I will gladly lift him up and spend time with him, but to date he is the only one. I guess this is why I build my layout for me and not the kids. Matt (my eldest) is 12, and he now will stand and be interested for maybe 15 minutes but he has a little step ladder and he is fine.

 This bodgey photo of some likely looking lads should give an idea.

 In conclusion, my opinion is to build your layout to the height you choose and be happy with it, and don't conform to anyone else's opinion. It's your layout and you will spend more time at it then anyone, so do it for you.

Happy Modeling.

Andrew

Thursday, July 1, 2010

News Update

Hi Everyone

Just a quick post for some upcoming events.

Bowen will make an appearance on the exhibition scene again, This time it will be at the Our Town Hobby Show in Newcastle. This will be held 4th and 5th September at the Newcastle Jockey club. Before the year is out we will also be displaying Bowen at the New England Model Railway Club Convention in Armidale on the 6th and 7th of November. I am particularly looking forward to this one as there will be some fantastic presentations from well renowned modelers. Please read the website for details.

For all of you who are interested in P87 and want to learn more, Ian and I have started a new Yahoo group. This is dedicated to Proto 87 modelers in Australia. Regardless of where you model (NSW, VIC, SA, USA etc) or what era, this is for Aussies to get into the same room to discuss the development of P87 and to problem solve. It doesn't matter if you are new or experienced, none of us know everything so this could be very exciting for this avenue. To join there is no hiding behind fictitious names or credentials. You will be asked to understand the rules of the group and to fill out a CV (curriculum vitae) so everyone on the group knows each other, what they have done and what they are involved with.
I know it seems a bit formal but we believe this will help create an atmosphere of  friends discussing our hobby around a dinner table.
Go to the group by clicking on this LINK.

So now I will disappear for a while as there is much to do.
Happy Modelling,

Andrew

Sunday, June 27, 2010

Scenery.....

I know a few have been asking for this so here goes.

As you now know, the layout is built on high density foam, the advantage of this is you can now add foam to build hills and curve the foam away to create valleys, gullys, drains and gutters.  At this stage all we have is track laid on a flat surface, now the ground is rarely, if ever flat. The most important thing to think about is the formation of the land, land rises and falls in all directions. When you are doing this,  try to ignore the track without forgetting about it completely. What you’re trying to achieve is the line cutting through the landscape. Look at photos and you can see where the railways have made cuttings and land fill to build the line to give it steady grades. This is an important stage, it really forms the basis of your scene. The exciting thing here is, as you’re creating the shape, you will start seeing where to form roads, water courses etc. Which really spurs you on to keep going and your layout will start to look like something from the real world.

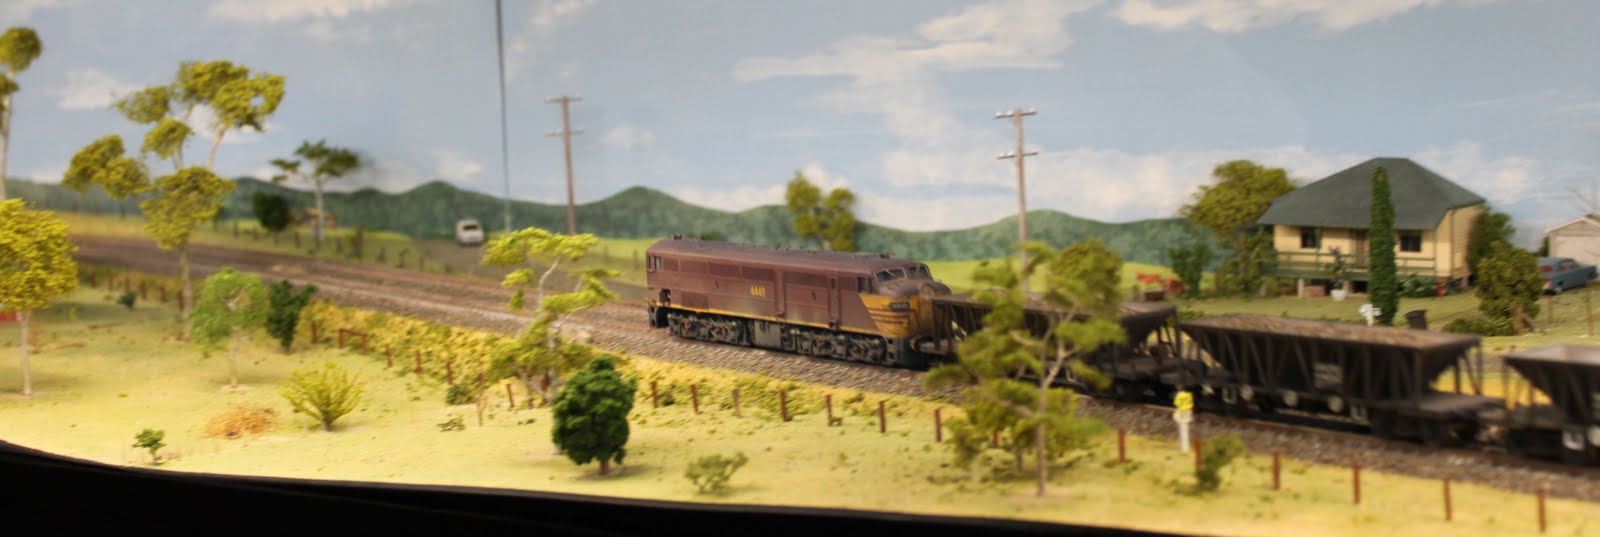
A few tips here, everything is easily repairable so don't panic if what you have just done doesn't look right. The railways made banks and cuttings to specific angles so do some research into this and make allowances for adding plaster, dirt and rocks. Print photos out and stick them up to give references as to what you want an area to look like. Too much info is never enough so keep collecting.

Next step is to paint the foam, colour isn't that important here but choose one better then what we did, an earthy tone is the go but keep it on the lighter side. This also helps to seal the foam and stops those white flaky bits turning up.

Now there is no need to plaster the whole scene, this would add to much weight and is only necessary were you want add fine detail. The cutting is one such area to be plastered as you need to add the wash out of dirt where water would have run. Now you could go nuts here but on this occasion we choose to keep it subtle. Mix up your plaster so its nice and pasty and have a clean bucket of water handy. Add a bit of colour dye to the plaster to get rid of that stark white colour, wet the area and apply. As the plaster is setting grove out the water course, making sure to not get it too uniform. This is also a good time to add very fine dirt so to get some texture. After it has dried I used some acrylic paints to get a good base colour but don't make it uniform. Paint in a mix of browns,reds and orange. Then add dirt to the wet paint in the colours your after. See Chuck or collect your own.

With colour its all about blending many tones, uniformity is a no-no in the natural world. So now you need to think about what came first, eg, dirt then rocks then dry grass then green grass etc etc. Your particular application will most likely be different to mine so use these as a guide.
Once the dirt is glued and dried it is tricky to get the glue down for the grass as it can clump the dirt up, so thin it and don't over do it. When the grass goes down the same rules apply, blend colours and work from the ground up. The dirt is important as the grass should be patchy, look under the trees in the above photos, you don't want a carpet of grass. The electrostatic grass is really the only way to go, there is still a place for the flock but not like it used to be.

At this stage you can start to add the detail, fences, bushes, trees etc etc. The one thing we did try was the grass tufts from silflor. These are fantastic and bring realism to any scene. Once again you can see, build from the ground up.

Other things you can do is to pick a small area and go to town on it. Over time these feature scenes will blend to give a really nice effect. This is another scene where we used plaster to get that washed away look.

I focused on the bridge module for this post and I think you guys can get an appreciation of how we went about things, it was enjoyable to do and to be honest we could continue adding to these scenes but overall, I am very happy with them.


Cheers

Wednesday, June 16, 2010

A Model Weekend....

Saturday 6AM, Ian shows up at my door to depart for the Epping Model Railway Club Exhibition at Thornleigh. After a good run and a horrible Maccas breakfast, we arrive at 9.45AM and park the car on some what of a goat track. Phil Collins was supposed to be at the round-a-bout to direct us to the underneath car park but here he is at the top of the hill. So after a bit of stirring, we head down to the show.  We caught up with a number of people, first of which was Brad Hinton. Brad always writes a good article on the Epping show so I wont repeat it, click here. It was also good to catch up with Allen Brown, Aaron Denning, Tom Rogers, Justin Moy, Steve Pracy and even Stephen Ottaway. Also met Dale Richards and checked out his Lever Frames. These are unbelievably good. Will be getting these for my Merriwa layout. If your not on the Yahoo Group click here.
So after a good day, left and spent some hard earned at Toms then checked into my folks for dinner. At 7.30 we arrived at Ray Pilgrims to check out his Bylong layout. It was a brilliant night. Ian and I don't get to "play trains" very often, so when it comes around you can only wish to find a pair of gems like Ray and his wife Christine. Lovelier people you couldn't wish to meet. Check Ray's blog for the events of the night here. Thanks Ray, that saved me some writing.
Sunday morning saw us at Hobbyland, stupidly I didn't get any of IDR's kits at the show, so I picked up some things at the shop but missed out on some of SDS's cattle containers. Oh well, maybe next time.
Stopped in to see Rowan Mangions Main South layout (under construction). This is quite an epic task Rowan has set for himself,it will be interesting to see it when complete. Slipped round the corner to his dad's (Sam)to see his layout, I tell you these boys have parted with some coin.
Anyway that saw us arrive home around 5PM pretty exhausted. Can't wait to do it again though.

Cheers

Monday, June 7, 2010

A Little Inspiration.....

I was cleaning up some files this morning and found some photos that were taken when Aaron Denning paid a visit. He had a new camera and was keen to try some things. John Barrett had a model circus he built stored at Ian's' so the backdrop was placed on Bowen and a new scene was created. John's circus was modelled at dusk, which means it was back lit through the backscene. It is painted perspex. Anyway the photos will explain better.

44 on tour
A small load


It was a bit of fun, after all there wasn't even track laid on module two at this stage. John has 1000's of little lights to wire up on the circus and it's my job to do it, so one day I will get some pics of the circus and post them. It is quite a piece of modelling.

Thursday, June 3, 2010

Making a point, part 2

OK so we have our little frog already to go, but there is one other part to be manufactured and thats the blades. Now I tried using the fast tracks file jig and to be honest, I don't know if it were me or the jig but I just wasn't that happy with the shape I was getting on a filed blade. I don't quite know how to explain it, but if you look at the prototype a blade swings back to the centre of the track after it leaves the heel. Only ever so slightly but it is what it does. After reading The Australian Journal of Railway Modelling, number six, page 28, it clearly shows how a point blade should be filed. I don't know about you, but I was buggered if I could file code 55 rail and still see if I had it right. Andy Reichert from P87 Stores does point blades with a CNC machine and are the correct shape. I can't remember the exact price but it was something like $12 a pair. Well worth it.
Next was to get some rail brace chairs, I managed to wangle some out of stephen Ottaway, no mean feat. Now we have the main components to build a point.

So now its logical but it takes a little time. Lay your paper template, we did them in a group but probably wouldn't do that again. Just to awkward to handle. Lay your copper sleepers remembering to use the thinner sleeper where the chairs are to be placed.
Next start laying your straight stock rails, this is important as the rest of the point guages off this. Once this is done you can locate the frog and continue laying rail.

Once all the rail is down we can locate the chairs to fill the gap between the blade and the sleeper.
I think you get the jist of things and really its just, take your time and watch it come together.
Unfortunately I didn't take enough photos when these were built, something I have to improve on. The next group of photos I think shows why it's all worth the effort.


Anyway last post for a while, need to digress. Cheers

Monday, May 31, 2010

hmmmm....

Yep, part 2 of making a point can wait, I have been busy and haven't put anymore thought into it. I have been playing around the layout room and because of the resent cool weather and rain decided to do some weathering of my own. So due to my new spray room being so accessible and easy, I attacked an On Track Models LLV.Didn't want to go to hard but what the hell. Apologies in advance I only snapped these photo's with a little instamatic, "must get serious about photography one of these days."


I also had to get in and weather wheels and bogies so I brushed them with some Floquil Rust and roof brown, then followed up with a black wash. Then finished up with some Aim Powders and am quite happy with the results. Did a similar thing with the LLV.


Other then that I put a coat of primer on the Infront Models DOT Tanker. It's ready for the final coat but will have to wait till I go to Epping on the long weekend to pick up the right colour paint. Ian and I will be there on the Saturday so If  you run into us stop for a chat.


I also played around with Austrains MLE. I need to do some more to this as I had had enough by now but It still looks ok. I will need to look for some loads although I was thinking of making some rolled up tarps.


Anyway thats what I've been upto and now looking forward to Epping, as a visitor this time.


At the end of the day I stopped at the level crossing on the Canowindra Road, climbed on the bonnet of the Challenger and snapped a photo of 4716 leaving Bowen Creek after its shunting duties.